Monday 28 January 2013

High Speed Photography


High speed photography is a technique used to capture moving objects with a very fast shutter speed and/or flash.


Equipment generally needed is:

  • A camera- SLR would be idea and also one that can produce long exposures and manual focusing.
  • A flash unit - a flash that can be adjusted to different power values would be ideal, a speedlight flash is perfect for beginners. The flash is needed to freeze the motion of the said object
  • Tripod - To eliminate camera shake when holding the camera, A remote trigger would be useful too, again to eliminate camera shake when pressing the shutter button.
  • Objects.......camera, fruit, veg etcetc
A DARK ROOM is essential as this allows you to set your camera up at a long exposure (around 8secs). The flash will control the exposure time. This is because, with basic equipment alone, the cameras shutter is not quick enough to capture the moving object. Flash is quicker so using this method will allow the camera to capture the object when the flash exposes the said object. 

Another point to bare in mind is that the lower powered the flash unit is the faster the burst duration. So for example, to create an exposure time of less that 1/16000 of a second you would need to lower your flash to 1/16

Now the next point to take into account is HOW TO TRIGGER THE FLASH. This can be done a number of ways. There are triggers that set off by sound, which would've been perfect for our balloon popping experiment (see further down in post). We just relied on good old faithful eyes and ears and reflexes!

We had three stations set up for our high speed photography...


For the Balloon Popping set up we had a backdrop stand set up with a length of fishing wire (for transparency) tied to the centre. The filled water balloon would then dangle from this over a waste bin (which should catch the excess water when popped). We had a stick with a pin taped to the end to pop the balloon.
The camera was on manual setting of a 2 second timer, f/8, ISO 100, 10 second shutter speed. The camera was then attached to a tripod and then lined up and manually focused on the dangled balloon. We also had a second camera on AUTO settings to be the flash.
There were three of us in the group, Julie, Fanni and I. I hit the shutter, after the timer we counted down from three, on one, Julie triggered the flash on the other camera whilst simultaneously Fanni popped the balloon with the stick.

Now this required PERFECT timing and took quite a few attempts to get it just right. Here is our best shot! A few fun ones thrown in for good measure too!


For the Balloon Dropping set up, our station was the product scoop. We placed a small blob of blu-tac on the base to act as a target for the water balloon to drop on. A tripod was set up in front with the camera attached. The camera attached was on a manual setting of 2 second timer, ISO 100, f/5.6 with a shutter speed of 10 seconds, along with the second camera on AUTO to act as the flash to freeze time!


For the Fish Tank set up we had a Transparent rectangular fish tank fill 3/4 full of water. With a large piece of white card situated behind the tank we had a tripod with a camera set up on a manual setting the same as the Balloon Popping experiment although we did remove the 2 second timer as we thought it was unnecessary. The second camera used again on auto as the flash.


Photography studio Health & Safety

Health & Safety in the studio is a must.  To prevent any accidents from happening to yourself, staff and clients the below rules must be applied:


  • Ensure there are no loose cables, using hazard tape or duct tape secure all loose cables to prevent them becoming a tripping hazard.
  • When setting up the studio lights please take care that all tripod stands have the single leg aligned with the light fitting and the other 2 legs at the back, this prevents the stands tipping. Also take care to allow enough room for staff and models to manoeuvre in a safe manner around the studio ensuring that all lightstands are positioned accordingly for the desired effect but also in a safe manner.
  • When changing attachment such as a soft box to a snoot, extra care needs to taken as the model lights become very hot and can burn. If moving to a different location ALWAYS place the protective cover back onto the light unit, this prevents damage to the bulbs and burns.
  • When using the light fittings such as snoots etc please ensure that they are secured correctly before moving the stand and using.
  • Never leave the studio unattended

  • When packing away, ensure all light fittings are put away securely, if hung up please ensure that they are secured to the wall and above head height to prevent them falling and people banging their heads.
  • Place the light unit covers on securely before packing away into a secure place such as a cupboard or box, taking extra care to wrap any loose wiring.
Please take note that each studio setup is different and the above guideline is only general. A more specific check list must be applied to each studio shoot based on the equipment, props and persons involved.

A general health & safety risk assessment should be carried out upon opening the studio on a daily basis. Please see the following link to view an example health and safetly risk assessment

Sunday 27 January 2013

John French


JOHN FRENCH (1906–1966) PHOTOGRAPHER

During the 1950s and 60s John French was one of the leading photographers in the fashion world.  


The models he worked with included the most famous of the time, many were debutantes who went on to become well-known society figures. French persuaded the art editors of the national press to use his flawlessly lit images of top models and his work appeared in virtually every newspaper and magazine. 


Anne Gunning


Helen Bunney, photo John French. London, UK, 1957


Marla Scarafia in a Federica printed cotton sunsuit, photo John French. London, UK, 1958


Barbara Miura with Madame Crystal printed rayon poult handbag and neck tie, photo John French. London, UK, 1953


Susan Abraham in a John Cavanagh tiered evening jacket, dress and hat, photo John French. London, UK, 1954


Susan Abraham in Brilkie spotted evening dress and June Clarke in Baker Sportswear floral evening dress, photo John French. London, UK, 1954


High Key lighting


Grace Coddington in a Nina Ricci suit, photo John French. England, 1965
I think this was acheived with a softbox to the left of the camera, facing head on to the model. A reflector may have been used to bounce a soft light back up under the chin also.


Patterns galore!


The images above I think were achieved by using High Key and Low Key light set ups with a light modifier similar to a 
Gobo. The gobo I'm assuming has paisley and floral patterns on it. Maybe he used a barn door in order to isolate the light/pattern to particular areas of the models? I am now on a mission to achieve this look during my photoshoot on Tuesday so watch this space.........


 John French used mainly medium format cameras, usually preferring his Hasselblad or Rolleiflex cameras. He doesnt seem to appeal to any aspiring photographers, but his contribution shows that you don’t have to use much to get what you want, and it’s the photographer and his use of the light, not how much or how expensive his equipment is, that gets the perfect shot.

High Key


What is High Key Photography?

High key photography is when the lighting creates a shadowless image with a blown out/blank background.
This can be created with natural light, photoshop and studio lighting. In this post I will be focusing mainly on the latter (studio)

Below is a diagram of the basic set-up for High Key Studio Lighting. I researched and found that the majority relied on a 4 light set up but it can also be achieved with a 3 light set up too, as demonstrated in the baby image below


Diagram 1
Diagram 2

Example of 3 light set up
The above image was achieved using just three lights, 2 x background light, one key light just off centre to the right and a reflector on silver acting as the fill light.  

 
Over the past few weeks we have been experimenting in the studio with various light set ups including high key. I have added a few of my resulting images below for you to see.
I have also taken images at home using natural light and continuous lighting and with a little help from photoshop created the high key effect.
 
 
I love this image, I love the composition, how her whole face fills the frame. There is no use of negative space really, a little to the right has been kept to add contrast to her face and hair against the dark background.
I used photoshop to acheive this although it was slightly overexposed as was taken in the conservatory on a manual setting of ISO 200, f/3.5, ss 1/250
I cleaned up any blemishes (yoghurt lol) around her mouth and added a touch more details to her eyes with the burn and dodge tool, I then adjusted to blk and white and the added a curve layer.
 
 
This image was acheived by true Studio High Key, no photoshop cheating here!!!
The set up was identical to the one above in diagram 1. The modifiers used where a large rectangle soft box on the key light and a meduim square soft box on the fill light. The key light was set up on on f/7. My camera settings were ISO 125, f/8, ss 1/60 with my 50mm prime lens.
I cropped the image and extended the canvas on photoshop to create a large negative space to the models left. I think this image in black and white with the combination of the high key and negative space makes Lydias beauty jump right out at you!
If you wish to know how I extended the canvas on photoshop please comment and I will add step by step  instructions to walk you through it.
 
Lea


Low Key

What is Low Key Lighting in photography?


Is using light to create strong contrasts between light and dark. You can manipulate the full composite of an image using these shadows and highlights. It is likened to another technique that artists use named Chiaroscuro

My low key light set up was as displayed in my image below
This was the outcome of my lighting studio setup:


The camera I used here was a Canon EOS 1100d and it had a standard 18-55mm lens. I was  wide open at 55mm and on a manual setting of 
ISO 100, APERTURE F/9, SHUTTER SPEED 1/125

I cleaned the image up a touch on photoshop cs5. I added several adjustment layers, 
  • colour balance
  • levels
  • brighten/contrast
  • duplicate
  • variations
  • master opacity(to reduce the brightness of the blue)
  • another duplicate layer
  • layer order (switched them round to group them)
  • master opacity change to the background copy
  • Last but not least Merge all visible layers. 
  • I also used the patch tool to blend some slight blemishes on the skin surface.
I am very pleased with the outcome. It is exactly what I wanted.

My next challenge is to create a lighter low key style image like the one below taken by the the famous RANKIN


Annie Leibovitz photography research

Annie Leibovitz caught my eye whilst researching studio photography thanks to her AMAZING work with Disney for their Year of Million Dreams campaign. I love Disney and love photography, so my heart skipped a beat when I came across this little beauty!!!

                                                           
Queen Latifa as Ursula a character from The Little Mermaid

click here for Behind the scenes video

To create the soft illuminating light Annie used a large Octabank to the right of the camera, in front of this was a large scrim to diffuse the light thus creating a softer light.  Directly in front of Latifa on the ground were two large strip banks ( these to highlight the detailed underside of the tenticles). To the left of her were another two large octabanks held by assisitants, one to the left and one slightly overhead. One octabank boomed (lifted across) to direct light overhead. Underneath that a reflector to bounce the light back up. Last nut not least, an umbrella to light the background canvas.
WHAT A SET UP!!!
I think using the octaboxes instead of softboxes was the way forward in this kind of studio set up. With it being such a large area to cover in light the softboxes would have created too harsh a line where the light begins to diminish, with octabox the edges are much softer.
A great example of this is where Annie has chosen to use the strip boxes to light the underneath of tenticles. Perfect as the light from these is more direct than the octaboxes and the harder lines of light can start and finish exactly where the tentacles do too.
The reflector was placed to carefully direct the light back up off the ground where it was distributed from the above boomed octabank.


The Finished Masterpiece!
The overall effect the lighting produced was perfect, the soft light diffused onto Latifa herself helped her to stand out but also blend in with the shadows and moodiness of the scene. The strip boxes highlighted the tenticles perfectly.


Olivia Wilde as Snow White evil queen, Baldwin as the Mirror on the Wall........

A strobe light hit Olivia straight on through an umbrella, in the same locationand direction on the ground was a small head light to highlight the dry ice at her feet.


Alec was the dude in the mirror, obviously this was achieved with a little help from photoshop but the main image used was created like so.....


A beauty dish attached to a ring flash was located slightly above head height and to the right of the camera.
A strobe reflector was placed directly opposite with a slight tilt downward to create a rim light or halo on his hair. The final composition is perfect. The dark low key shadows add more mischief to the villainous (is that a word?) characters.

I want ALL these images in a calender, I don't think I will be allowed to have them hanging in my bedroom :( the OH  may protest!

Tuesday 22 January 2013

Studio Photography Unit


For the new term we have been assigned a new unit. The unit is based on Studio Photography.

Throughout this unit I will be learning how to achieve different styles of studio photography by using different techniques, technology and media in the studio.
I will produce my own studio photography to demonstrate my findings, based on historical and contemporary studio photography practice.

On completion of this unit I will be able to:


  1. Understand the characteristics of studio photography
  2. Have an understanding about studio photographic media, techniques and technology
  3. Produce examples of own work/photography within the studio
  4. Review my own studio photography
  5. I will demonstrate my finding over the next few weeks on my blog


Leanne

My Studio Photography Snoots, gels and whatnot!!!

During this term my class and I have been introduced to Studio Photography.

Our tutor and his assistant are to be teaching us how to apply different techniques using a wide range of studio equipment such as snoots and barn doors to get creative lighting effects from the studio strobes or flash lighting.

On my first day in the studio we experimented with strobe lighting using barn doors, snoots, reflectors and gels to enhance our portrait photography.

One of the key things to remember regarding studio lighting is that there are basically two kinds; continuous light, and strobe lighting. Tungsten lights are ones which provide a continuous source of light. Strobe lights on the other hand emit a flash when triggered, and are the most common kind of light you will find in most modern studios.

Strobe lights are used a lot in fashion and portrait photography, as they’re the same colour as daylight so no alterations to the camera’s white balance are needed. Tungsten lights on the other hand tend to be quite warm and emit a yellow glow, and so filters are needed. They also become very hot when being used and this limits the amount of accessories you can use with them because of health and safety risks. For example if you was to use a softbox on on a tungsten light, it would be a fire hazard.

We initially used one strobe light and the following kit
Clockwise from the top Barn door, Reflector, Snoot

A Barn Door is made of four adjustable flaps in a square shape that attaches to a mount which fits the strobe light. Each flap can be adjusted to move the light into a different direction causing highlights and shadows wherever you want them.

A Snoot is a cone like metal tube that fits over the the front of the strobe flash light. This is to direct the light into a small area in particular (bit like a mag lite)

Honeycomb grids can be attached the the above too, they help to give a more accurate direction of light and help to soften the edges around the said light.

Narrowing down the beam of light produced by the strobe light allows us to create directional highlights on our subjects.  It also allows us to place lighting behind the subject without blinding the camera. I will go into this in more detail later :)


The images above are a few examples of my results using a snoot, and lovely model and fellow student Fanni. The images were taken with a canon eos 1100d, f/stop 9, ss 1/125, ISO 100 , lens was open at 55mm and I was about a mtere away from the subject. The bowen strobe light was set up with a snoot and I had a colleague holding a reflector to direct the light back up to the models face. The power was set to half as I didn't need too much as it was set up pretty close to the subject to create light falloff and a more direct channel of light on her face. I also experimented with a blue gel slave flash light in the near background. ( I will be discussing flash gels in my next post)

I have also edited these on photoshop with a slight gaussian blur mask and a touch of blue fill to create the cold look.

I will go into more detail regarding the photoshop editing in another post, step by step.

During this photoshoot I learnt something fascinating........Light falloff

LIGHT FALLOFF:

Creating a dark/black background that is originally white/light. This is achieved at its best in a large room where the subject/model is in the centre of the room and not too close to the background wall. The strobe lighting(with desired attachment  is then placed close to the subject/model. What happens is that the camera will record the main light hitting the subject/model and darken the area behind because of fall-off caused by the Inverse Law of light. This is best used where there is some depth to the area behind the subject. Walls should be at least 10 feet away. Darkened rooms offer best results.


Please visit my other post STUDIO LIGHTS & MODIFIERS for a more details on light modifiers.

Lea
x 


How to create a Triptych Template

So today in class we had a tutorial on ho to create a Triptych template in Photoshop.

Here is how we did it:

Step One: First of all I opened all three images I wanted to include in the triptych ensuring all images pixel dimensions are the same. This is done by going to Image > Image size


Step two:
I then created a new template, named it window, adjusted the canvas size to 6x9in, 250 pixels/inch background white.


 I created a new page with the above settings.

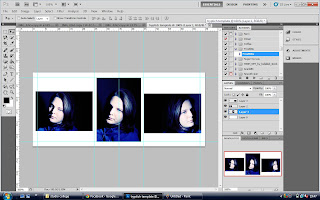
Step Three: Once my layer is open I make sure my guide ruler is on and snap tool is checked also. This was to enable me to snap a few guides onto my template to ensure the three images were going to be positioned correctly

Step Four: I then begin to drag my images across to my triptych template.(left click and drag)
I then move the images around to where I would like them then start to snap the ruler guidelines to ensure the images all align and are positioned correctly. This is were the snap tool comes in useful!
BEFORE
AFTER

Step Five: Once the images are in position you can adjust the background colour to whatever you like (I tend to use a shot of the surrounding landscape if I'm shooting on location) in this case I opted for a black.

Step six: To highlight the frame of the images I add a stroke line to each frame in blue. This is how:


Merge all visable layers > select the area you wish to frame with the rectangular marquee tool (this is why the guides have not been removed yet) > Edit > Stroke > Then add the thickness by size of pixels, I go for 4 as I only want a fine line > OK > Hide all the guides by selecting "View" from the top menu bar, followed by "Show" and "Guides." This hides all the guides.


Voila
I want to save this Triptych as a template as you never know when it will come in handy. Here is how:

Step one: once the final image has been saved, duplicate layer, on that layer select the frame with RMTool again and right click and fill with colour. Do this to all three frames and it will look something like this.

Step two: 
Now on that top layer select the magic wand tool, highlight all boxes and inverse (see below image)

Hit delete and remove the background layer and this is your template:


To use this template over and over you simply drag and drop your images behind and adjust as needed with free transform. 
NB: Try to stick to the rule that applies right at the beginning of this tutorial  Ensure you images your transferring across are of the same size/pixels.